On completion of this stage you should be familiar with the following concepts:
|
Modeling notions: |
Reuse, Process |
|
Modeling techniques: |
Retrieve and display data from the database in a table |
|
Useful process templates: |
Action, Find |
|
Useful display templates: |
Simple Table |
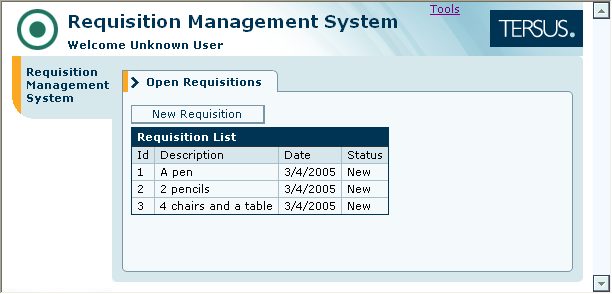
In this stage you will model the display of a list of requisitions retrieved from the database.
The resulting web application will look as follows:
This stage’s modeling should be performed in the Tutorial 3-4 project, you imported at the end of the previous stage.
In the previous stages we have learned how to display a form used for data entry and store the entered data in a database.
Next we would like to be able to view the data previously entered, in a tabular manner – one row per record.
The table will be part of the Open Requisitions view we have created previously.
Zoom to the Open Requisitions view by either:
Double-clicking on it in the editor
or
Locating it in the outline and double-clicking on it there
The table will be located below the New Requisition button, so make sure there's room for the new model we're about to create in the Open Requisitions model:
Resize the New Requisition button and position it near the top of the Open Requisitions view.
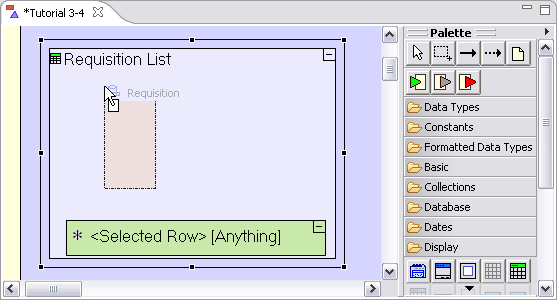
We shall start of by adding a Table Display to Open Requisitions.
Select the Display/Simple
Table template (![]() )
from the palette, and insert it into Open
Requisitions.
)
from the palette, and insert it into Open
Requisitions.
Name it Requisition List.
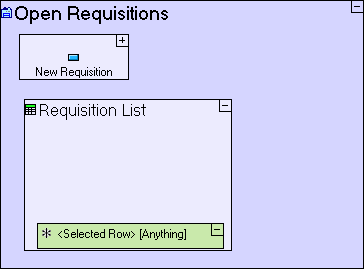
The Simple Table template includes by default, a <Selected Row> element. We will ignore this element for the time being, but will make use of it in Stage 6 of the tutorial.
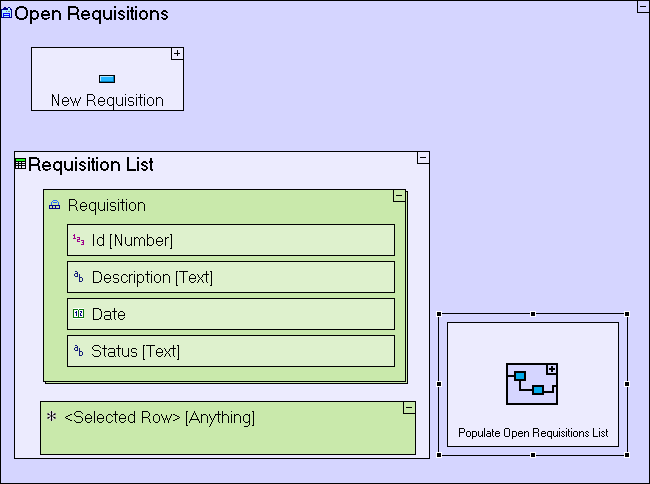
The Open Requisitions view model should now look similar to the following:
We would like the table to be as straightforward as possible and show all fields of Requisition (Id, Description, Date, Status), so we can simply reuse the Requisition data structure:
Reusing
previously defined models is an integral part of the modeling
process, and significantly improves both development speed and model
clarity.
When you reuse a model, any change made to it affects all
its occurrences. This ensures model consistency.
You can reuse any
type of model (data model, display model or process model).
Locate the Requisition data structure in the Repository view.
Or, in the Outline view.
Zoom into the Requisition List table.
Drag it into the model editor.
And drop it inside the Requisition List element.
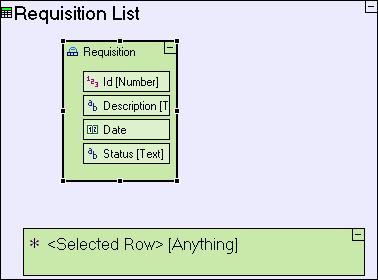
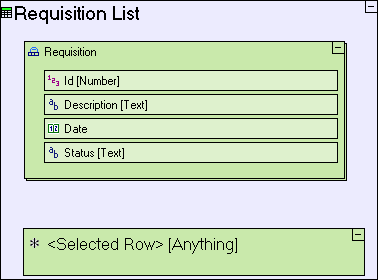
Now, since the table contains multiple rows, each repeating the same data structure (Requisition), we need to define the data structure as repetitive:
Right-click on the Requisition element we have just created, and select repetitive from the menu.
You
can verify that the Requisition element has been defined as
repetitive by:
1. Right-clicking on it again, and verifying that
repetitive has a check mark next to it.
2. Checking the
repetitive property in the Properties pane.
3.
Verifying that the Requisition element in the model editor,
appears stacked. (see in the screenshot below)
The Requisition List table model should now look similar to the following:
Save your work and view the application in the browser. It should look similar to the following:
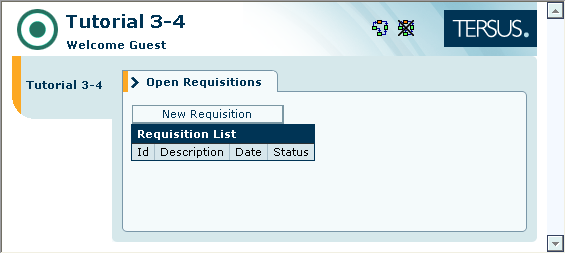
Notice that the Requisition List table is empty – the column titles appear, but there are no rows in the table. We still need to model the retrieval of data from the database to populate the rows of the Requisition List table.
We shall now model retrieving data from the database and populating the table with it:
Select the Basic/Action
template (![]() ),
and drag it into the Open
Requisitions model.
),
and drag it into the Open
Requisitions model.
Name it Populate Open Requisitions List.
The Action template is a
container for defining composite processes.
Since the Populate Open
Requisitions List has no trigger defined, it will be executed
automatically when its parent (Open Requisitions) is executed.
The name Populate Open
Requisitions List was chosen
because it is self explanatory. It has no
effect at runtime, and you can decide on any other name with no
change to application behavior.
The Open Requisitions view model should now look as follows:
Notice that Populate Open
Requisitions List is not a display model, but rather a process
model. It is not part of the display of the table (as is the
Requisition element of Requisition List), but rather
some processing that takes place in order for the table to be
properly displayed.
As explained above, it has no triggers and
hence it is executed automatically, so we call it an Initialization
Process. Any display model may contain such Initialization Processes.
The Populate Open Requisitions List process will generate a Requisition List data element (made up of Requisitions read from the database). The generated requisition list will then be sent to the display.
To generate the Requisition List data element, we shall create a sub-process to the Populate Open Requisitions List process:
Zoom into Populate Open Requisitions List.
Select the Basic/Action
template (![]() ),
and drag it into the Populate Open
Requisitions List model.
),
and drag it into the Populate Open
Requisitions List model.
Name it Generate Requisition List.
The Generate Requisition List starts by retrieving data from the database. This is performed by using the Find template.
Select the Database/Find
template (![]() ),
and insert it into Generate
Requisition List.
),
and insert it into Generate
Requisition List.
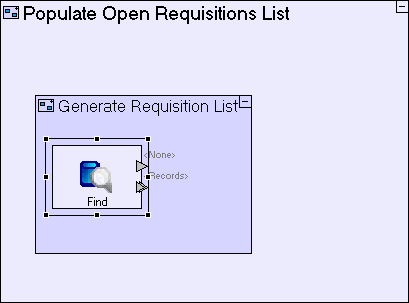
The Populate Open Requisitions List action model should now look as follows:
The Find template includes two exits, <None> & <Records>, which are “activated” (and expose output) depending on whether Find finds any records or not. If no record is found, the <None> exit is activated. If at least one record is found, the records are exposed through the <Records> exit.
If
you look closely at the <Records> exit, you'll notice
that it is marked as repetitive (![]() ),
meaning that Find can output multiple records.
),
meaning that Find can output multiple records.
We still need to define the database table from which Find Requisitions should retrieve records. This is defined through defining the Data Type of its <Records> exit - the data structure that the exit outputs. This is defined next.
The records retrieved by Find should be stored in the correct data structure, which in our case should be a data structure representing the Requisition List display we have previously created.
Drag the Requisition List model from the outline, and drop it next to the Find Requisitions element.
This creates a Requisition List Display Data Element, which represents the Requisition List model.
Note that the Display Data
Element we have just created is similar, but not identical to the
Display Data Element we created through the Add Ancestor Reference
function (in Stage 3).
The similarity lies in that both
are data representations of display models. The difference is that
through Add Ancestor Reference, you create a reference
to the actual runtime display (providing access to the displayed
data), whereas in the current situation we are creating a new display
data element in memory which has the same structure as the display,
but is not the actual runtime display. Another way to put it is that
we have created a logical (or in-memory) display data element.
Next add Flow that will create the Requisition List table from the records provided by Find Requisitions:
Expand the Requisition
List element (by clicking the
![]() sign at its upper right corner) to display its content.
sign at its upper right corner) to display its content.
Select the Flow tool to link the <Records> trigger of Find to the repetitive Requisition data element in Requisition List.
By
creating the above flow you have done two things:
1. Explicitly
defined where the output of Find should go (the Requisition
element of the Requisition List table);
2. Implicitly
defined the data type of the <Records> exit of Find,
i.e. Requisition. Since the Requisition data type is
based on a Database Record template, Find knows which
database table it should access (the Requisition table).
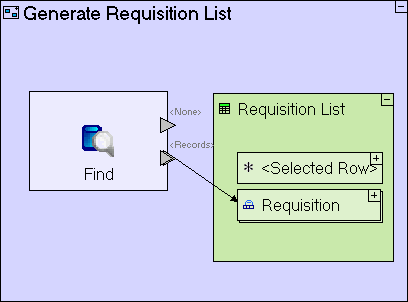
The Generate Requisition List action model should now look as follows:
The Generate Requisition List sub-process is meant to output data (the Requisition List display data element), so we need to define what data will be output, and where the output will be stored.
Select the Exit
slot (![]() )
from the palette and click on the frame of the Generate
Requisition List element.
)
from the palette and click on the frame of the Generate
Requisition List element.
Select the Flow tool to link the Requisition List display data element to the Exit slot we added.
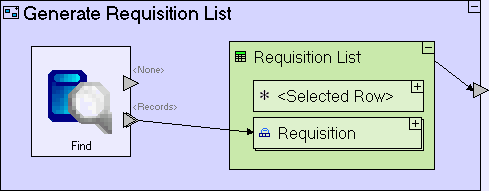
The Generate Requisition List sub-process should look as follows:
In the previous stage we showed how to use an Ancestor Reference display data element to retrieve user input from the display. We shall now use the same technique to perform the opposite, i.e. output data to the display.
Zoom to the Populate Open Requisitions List element.
Right-click on the Populate
Open Requisitions List element, select Add
Ancestor Reference from the menu, and select
![]() Open Requisitions.
Open Requisitions.
Now we can use the Open Requisitions ancestor reference we have created as the target to which Generate Requisition List will send its output table.
Double-click on the Open Requisitions data element to zoom into it.
Expand the Requisition
List element (by clicking the
![]() sign at its upper right corner) to display its content.
sign at its upper right corner) to display its content.
Use the Flow tool to link the Generate Requisition List exit to Open Requisitions/Requisition List.
The Populate Open Requisitions List model should now look as follows:
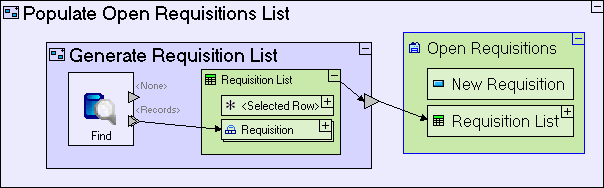
Save your work and view the application in the browser. It should look similar to the following:
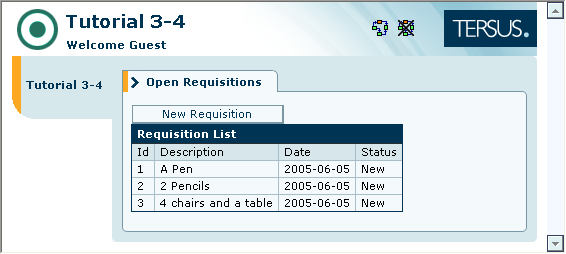
The data displayed in the table, is data you previously entered (or data bundled with the Tutorial 3-4 sample application).
Now try entering a new requisition:
Click the New Requisition button.
In the Enter New Requisition popup, enter a Description, and click Submit.
Notice that the table is not updated, although the data is saved, as you may verify by refreshing your browser.
Expecting the user to refresh the browser display manually is unacceptable; the table must be refreshed automatically when a new requisition is submitted.
Refreshing the display means populating the Requisition List table with the most up-to-date data available, which is exactly what we have just finished modeling, so we can reuse the Populate Open Requisitions List process.
Since refreshing should be performed when the requisition is submitted, it should be modeled within the Submit Requisition button:
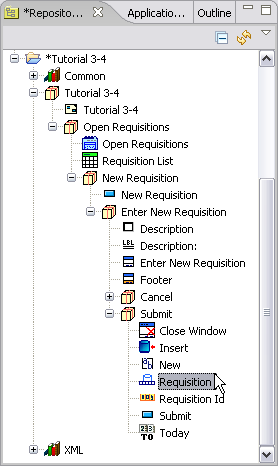
Zoom to the Submit button we've created in a previous stage.
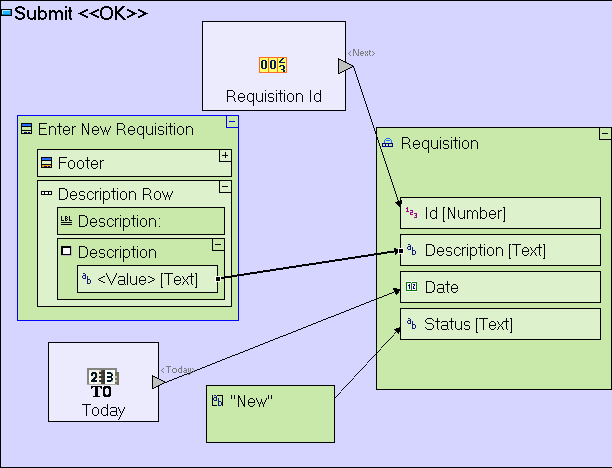
At this stage, the Submit model should look similar to the following:
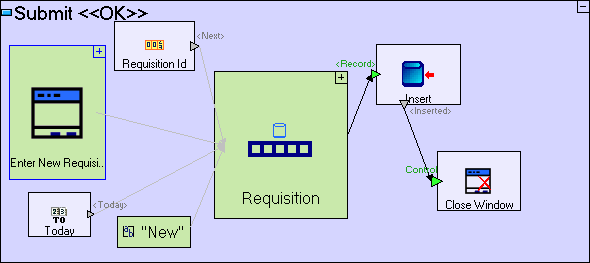
The light-grey arrows that appear in the screenshot above (flowing into Requisition), signify that the source or target of the flow, are not displayed (because their parent has been collapsed)
Add a new action process to the button to perform the required refreshing, after the requisition has been inserted successfully:
Select the Basic/Action
template (![]() ),
and drag it into Submit
Requisition.
),
and drag it into Submit
Requisition.
Name it Refresh Requisition List.
Select the Trigger
slot (![]() )
from the palette and click on the frame of the Refresh
Requisition List element.
)
from the palette and click on the frame of the Refresh
Requisition List element.
Select the Flow tool, and link the <Inserted> slot of Insert to the Trigger slot of Refresh Requisition List.
Note
that the trigger added to Refresh Requisition List
demonstrates an alternative method for adding a trigger which
controls the order in which processing occurs. The other method
(using the Add Element context
menu option) was demonstrated on the Close Window element
we added (see Stage 3).
This
also demonstrates that the name Control
itself has no effect on the way the trigger acts. It just makes the
model more readable (exposing the trigger's purpose via its name).
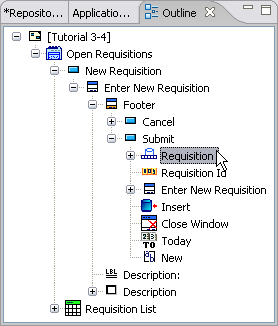
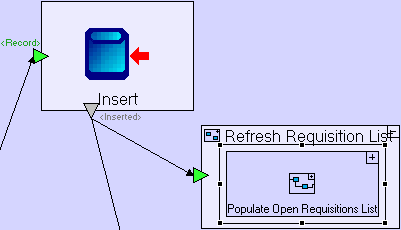
Your model should now look similar to the following:
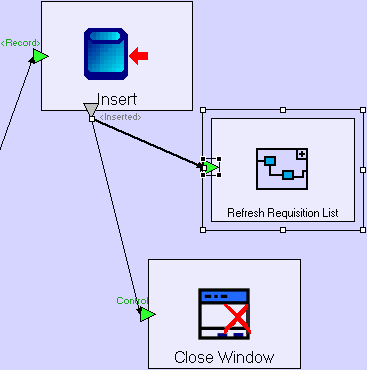
Notice that slots can serve as the source/target of multiple flow definitions. In our case, when the Insert model exits successfully, Close Window and Refresh Requisition List are both executed.
Now let's reuse the Populate Open Requisitions List process:
Drag the Populate Open Requisitions List process from the Repository (or Outline) and drop it into Refresh Requisition List.
The Refresh Requisition List model should look similar to the following:
You may be wondering why we ‘wrapped’ Populate Open Requisitions List in another process (Refresh Requisition List), instead of placing it directly in the Submit button model, and creating the flow from Insert directly to it. The reason is that in that case we would need to add a trigger to the Populate… process, and since the process is reused in the Open Requisitions view, the trigger will also appear there, and will stop functioning, as the trigger receives no flow in that scenario.
Save your work and view the application in the browser.
Try entering new requisitions and verify that they appear in the list.
Import the sample project Tutorial 4-5 and use it as the basis for the next stage of the tutorial.
For a reminder on how to import a sample project, see the Importing a Sample Project section at the end of Stage 2.
This sample project contains all the functionality modeled thus far.
The sample project also includes additional functionality, as follows:
1. Place the Description text area and label in a row element, for improved formatting of the popup

|
How to Model |
Located in |
|
Add a Display/Row. Name it Description Row. |
Enter New Requisition popup |
|
Drag Description text area from repository/outline. Drag Description: label from repository/outline. |
Description Row |
|
Delete Description text area. Delete Description: label. |
Enter New Requisition popup |
2. Fix flow in Submit Requisition model
|
How to Model |
Located in |
|
Click on red flow arrow. Drag source to Enter New Requisition/Description Row/Description/<Value> |
Submit Requisition button |
You may now proceed to Stage 5, in which we shall add support for an Urgency field to the requisition.
Click here to open the live project in a separate window.